Edit
Upfall shower assembly
Rain shower... Rain shower... Waterfall shower... just a few names for a water-consuming way of showering. Until recently, because with the Upfallshower you get that lot of water over you, only with less water use than with the smallest hand shower.
On this page we pay special attention to points that you should pay attention to when placing.
Delivery of the Upfall shower
The Upfallshowers are first extensively tested in the factory, after which they are packed in a box and hit the road. Make sure that the driver takes the Upfallshower as far as he can reach and does not remove the Upfallshower from the packaging or bring it inside. The Upfallshower drain has a weight of approximately 40kg.
When lifting, make sure that you only hold the system by the fixed parts of the frame.
The floor
The floor area where the Upfall will be placed must be flat. Minimum surface area 80x40cm to be able to properly place the system with the drain. The Upfallshower has a built-in depth of 9.5cm under the tiles. It is then assumed that the drain is completely flat on the floor. If the drain rises one cm towards the Upfall, add this to the installation depth.
Plug and play installing rain shower
The Upfallshower is delivered as a complete product. Weight 40 kg, almost all parts are pre-assembled so easy to install. The overhead shower and shower arm are supplied separately, as well as the hand shower with hose and siphon. The complete system has been tested in the factory in Dronten.
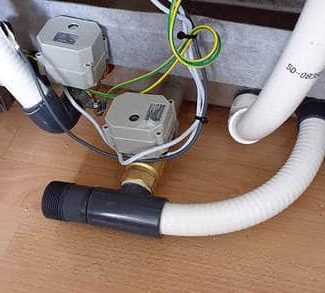
Siphon
The screw thread on the back of the Upfall can be seen to which the supplied siphon must be attached. Make sure it is securely fastened before placing the Upfall.
The Upfallshower comes standard with a siphon on the right side.
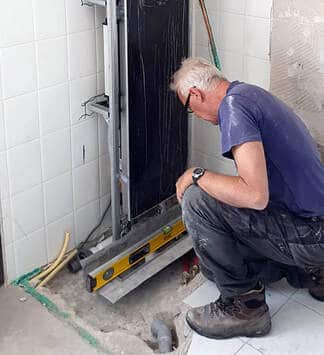
Level
It is very important to level the system in order to ensure that the water drains well and that it is possible to use tiles later on.
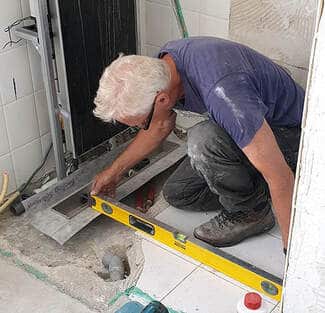
Graduation
Ensure a good return of the water to the drain. The Upfallshower system pumps the water around 6 to 7 times per minute. It is therefore important that the water can drain properly.
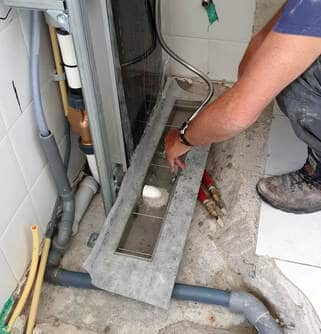
To test
After connecting the water and drainage, it is important to test the system for watertightness. In the beginning, a small layer of water may remain after emptying. This is because the siphon is still new. The siphon has a rubber spout that closes automatically when no water flows through it. The small amount of residual water cannot push this spout open at first. After some time of use, the rubber will become more flexible and the drain will drain better. But here too...look closely at the end of the sewer. If in doubt, choose a slightly higher position of the frame of the Upfallshower.
Finish
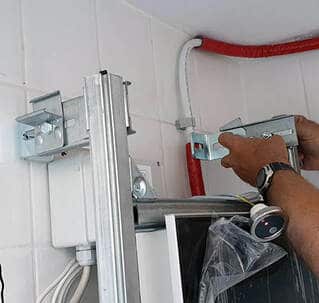
You can also install the Upfallshower narrowly, as is done here. The brackets at the top of the frame that touch the wall are turned inwards as shown in the photo.
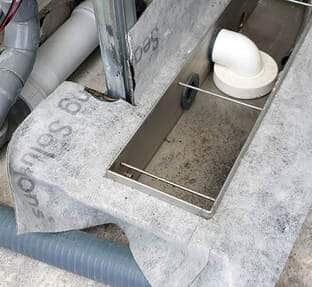
The drain has a raised edge at the back. The raised edge on the drain is sawn in and bent backwards with pliers bent back horizontally as best as possible.
Finish frame
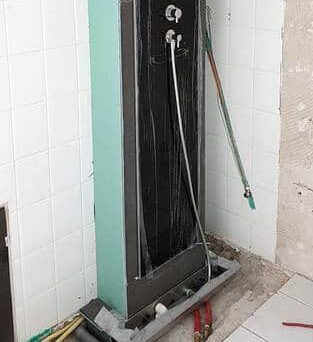
It is important that the floor to be poured may not end up behind the drain. During service, the glass plate can be removed and all parts behind the system can be accessed. That is why it is also important that the siphon is accessible and can be loosened if necessary. The exterior finish is done with waterproof plasterboard on the sides and the front with 6mm Wedi panel. These so-called "sandwich" panels are available at every professional hardware store. Other 6mm sheet material is also possible. The frame of the Upfallshower cannot be adjusted in depth, so for the outside finish you have to take the thickness of the finish and the thickness of the tiles into account. For the finish, we glued slats to the wall and the plates are also glued to the slats. Also do not forget to apply bilge tape to the vulnerable places of the drain that have been sawn.
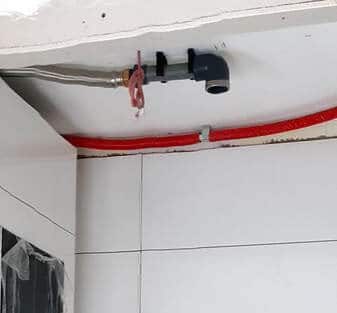
Connecting rain shower
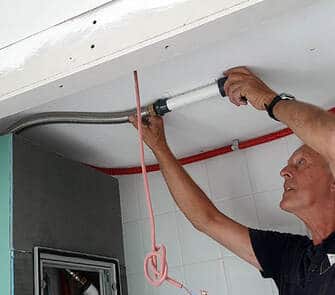
A reinforced 32mm hose is included for the overhead shower with ceiling mounting. This can easily be screwed onto the swivel behind the frame of the Upfallshower.
The last piece with the connection for the overhead shower is made of PVC and can be installed by an installer if necessary, this is not included. It is important that the water from the connection hose of the Upfallshower can run back to the shower head or in the opposite direction. We had the coupling protrude through the ceiling. With a copper adapter 5/4 x 1/2 we can use any standard shower head. For example, if you want a shower head that is smaller.
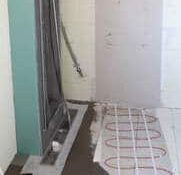
Underfloor heating under the tiles
Installing underfloor heating under the tiles will ensure that the Upfallshower will work even more economically, because less hot water needs to be topped up during use.
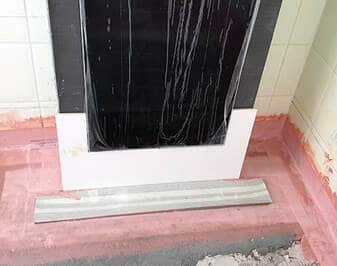
Kim band
Very important is a good finish with kimband to ensure that all connections are watertight. Materials such as tiles, grout, sealant can always start working and the risk of leaks is therefore always present if you do not use kimband.
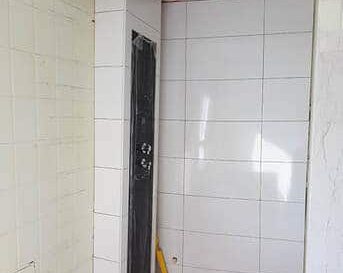
tiling
Since the drain is the lowest point of the bathroom, we also started there with an entire wall tile under the black glass.
Sealing panel
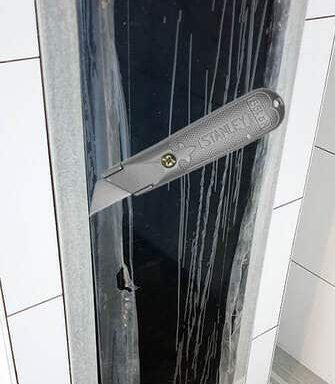
Peel the foil on the black glass slightly from the edge. Use wallpaper or paper tape and stick it over the glass, the built-in frame and the tiles. Now cut along the outside of the frame (i.e. between tiles and frame) along the edge of the aluminum frame so that the tape remains on the edge of the frame. It is now easy to seal between the frame and the tiles.
Cleaning drain
Before testing the Upfallshower, clean the drain well.
Nice words from many satisfied customers!
2018
We have had the Upfallshower for years and it does what it is supposed to do. The customer a wonderful sustainable wellness shower and for us a minimum of water and energy, that is the shower of the future. Call for availability 088 523 00 00
2016
I am now 70 years old and it saddens me to see how we treat the earth. Even at my age, I still want to do my bit and opted for an Upfallshower that I have been using for a few years now, with less water/energy and waste water and more comfort.
Ellie de Jong
My gas usage has decreased by 35% since I have been using the Upfallshower with my wife for a year. How much less would the use have been if both my daughters had still lived at home.
René Betgem – Creator Upfallshower
2021
A practical innovation with impact in my view. The shower provides enormous savings in precious (heated) drinking water. Compared to the conventional rain showers that easily drain 15 liters of water per minute through the shower drain, the upfall easily saves us 70% in water and energy without compromising on comfort compared to a traditional rain shower. Kudos!
2021
Our new house is completely energy neutral. We use two Upfall showers with 5 people and we enjoy the wonderful sustainable rain shower every day, a wonderful product. We have opted for a small boiler and we are never short of water.
2017
We are at home with 5 people and have been showering under the Upfallshower since 2018. Drinking water is of vital importance and we believe that our children should learn from an early age to be aware of the use of water. With the Upfallshower you have a wonderfully sustainable rain shower.
Martijn Stronks
2018
Through measurements I found out that the water consumption of my family has dropped from 200 m3 to 117 m3 in a year's time and that is of course an immense difference! The Upfallshower at our home uses 1.2 – 1.3 liters of warm water per minute.
Jeroen van Lith
2016
The Upfallshower drastically reduces energy and water consumption during showering, while increasing shower comfort. Since the hot water demand decreases during showering due to hot water recovery, the boiler in a home can be dimensioned small(er).
Marijn Engels
2020
We are very satisfied with the Upfallshower and the good service and information. I am very happy to hear that the showers can finally be placed in hotels. Wishing you much more success with this brilliant product!
Martijn Mulder & Nina Kraus
2019
As a total installer I have designed and built my own energy neutral house. I have placed three black Upfallshowers drain with black taps. A beautiful sight and I have a much smaller hot water supply than I would normally need.
Harold Hotebri
2017
We have been using the Upfallshower since 2017 and are very satisfied with the Upfallshower, the large shower head gives off a wonderful amount of water, while little water is used.
Kees Leenders
2016
We have been using the Upfallshower since 2016. In the context of sustainability and economical use of water, we thought this shower was ideal for our family. And it is: every shower we enjoy the firm, powerful jets from the super deluxe and large shower head.
rola
2015
The Upfallshower is not only a very sustainable product with impressive savings, but also offers solutions for the desire to apply a very comfortable shower without requiring many adjustments to water yield and hot water generator (enough hot water quickly enough).
Iwan Fransen
2017
We were drawn to the Upfallshower by friends. The idea of being able to take a really nice shower again and also do our bit for the environment through the economical installation made it an easy choice for us.
Martijn van Hellemond
2018
We also wanted to build a sustainable house and opted for the Upfallshower. As a family we are happy with this sustainable shower and enjoy it every day. By keeping the system clean, it is hardly noticeable that the shower partially recycles the water.
Anton Chest
2018
I designed and built my own house with a very small water heater for my bathroom of only 30 liters, enough for us together to shower with the Upfallshower. We now shower very comfortably with a unique shower that partially reuses water, it just couldn't be more sustainable.
Pieter Bardoel
2018
The Upfallshower saves more water than a water-saving shower head. In our view, the Upfallshower is a truly beautiful product that we are very happy with. It gives us a good feeling that with the Upfall we have less negative impact on our environment.
Ian Weiler
2014
We also decided to build in a piece of music and a color lamp, our son is the main user. The whole cab works great. All family members are extremely satisfied with their piece of luxury.
Martin Bakhuijzen
2017
My son and I mainly use the Upfallshower, my wife prefers to use the saving hand shower that is also included with the system. Our son can achieve shower times of up to half an hour under the Upfall shower and at times like that I am glad that we have such an extremely economical shower.
Jan Peter van Amerongen
2015
Since we have very little pressure here, the boiler can only produce 11 liters per minute, this Upfallshower seemed to be a good solution for this problem. The fact that this shower is also water-saving and economical in gas consumption was also a very big plus for us.
Marina & Vitel
2015
In comparison, a shower with an economy shower head is a bit shabby… and that while you save even more water and energy with the Upfall shower!
Linda Fransen
2018
As environmental permits coordinator, I am involved in sustainability on a daily basis. My own home has an EPC value of 0. I opted for the Upfallshower. Why? Very simple. The Upfallshower has a positive effect of 0.18 on the outcome of the EPC.
Arend Hoekema
2017
Investing in sustainability and still wanting luxury in the bathroom, that brought us to the Upfallshower. Our self-designed houseboat had to be sustainable, so also our bathroom. Now we can fully enjoy our shower without feeling guilty.
Family Bakker
2019
Very happy with our new bathroom with an Upfall shower. Beautiful to look at and with UV, Infrared, Bluetooth speakers and steam option in addition to the usual possibility to shower under a warm rain shower or to use a hand shower.
Francisca Valenbreder
2018
We wanted to make our new home as economical as possible. Solar panels, a central heating pellet stove, rainwater storage with filtration, a solar boiler and of course a sustainable Upfall shower. We are not bathers, but we would like to have a luxurious shower and that is now possible.
Bergsma . family
2015
All four of us use the Upfallshower every day and recently all five have been using it since 2016. After the first year of use, we even received a letter from Vitens asking why we used so little water!
Peter on the Hof
2020
More economical and more sustainable often means leaving something behind. The Upfallshower shows that economy and comfort go hand in hand and that is what makes it so successful.
Floris Vervat
Very nice product. We have been using this at home for half a year now and are very satisfied with it. Can recommend it! Wonderful shower experience and yet low water and energy consumption.
2019
A double rain shower, the pinnacle of luxury. When calculating we quickly arrived at a water consumption of 2×15 liters of water per minute and we thought that was really a bit too much at this time. In recent years there has been a lot of talk about drinking water use in the Netherlands and we felt we could of course not use 30 liters of water per minute.
Pim and Angela
2018
We started using the upfall at the end of June 2018. Until then, we had a 'shower temple' from hansgrohe, with a rain shower incorporated into the ceiling. Compared to our old shower, the upfall gives more water instinctively. At the same time, the savings on our water consumption are impressive. In 2019, we even consumed slightly less than half of what we did in 2017!
2016
This 'rainfall' shower is in one word DELICIOUS to use. We have been using the shower for 6 years now and we still enjoy the shower every day and we save a lot of water and energy!
2022
Our shower was installed in March 2022 and we are very happy with it. Cleaning is easy, a wonderful shower with hardly any water and energy consumption, real showering without feeling guilty. And if you have a question, they respond quickly, which is great.
2019
Of course, a sustainable shower could not be missing in our fully sustainable hotel. With minimal water and energy consumption, we have been offering our customers maximum comfort for years and they can enjoy it without feeling guilty. Top product, recommended for any hotel or bed & breakfast. Come try it out!
2021
We have 2 Upfall showers one in our bed and breakfast and one in our mini wellness. The guests keep writing about the positive experiences with this shower. We are also happy with it! Guests can take a shower without an insane amount of consumption.
2022
In 2020 we had an Upfallshower placed. We are very happy with this wellness shower, every day a party to take a shower, knowing that you save water and energy. The shower is very easy to maintain. We are very happy with this shower and hope to be able to use it for a long time to come.
2016
In 2016 we purchased an Upfallshower. We shower with no fewer than 8 people with an 80 liter boiler and we are very satisfied.
2022
We are moving and have ordered an Upfallshower again. The water and energy savings are enormous. We are more than satisfied!
2019
Where we have been flushing our toilet with rainwater for years, we also wanted to use water as economically as possible when we moved to Kijkduin. The approval for hotel use of the Upfall was the deciding factor in choosing this highly water-efficient shower system.
The gas price, which has unfortunately risen sharply due to the Ukraine war, significantly shortens the Upfall payback time. A very profitable investment, which you will enjoy every day immediately!
2024
We are moving and have ordered a new Upfall!
2024
As you can see above, it has already been a year since the upfall shower was delivered and installed. I can say that it is doing very well. In short, it is wonderful to stand under it and the fact that it is also good for the environment only makes it that much more beautiful. I would like to thank you, although a little late, for your support and thoughts. Most importantly, René called me to ask if I could rebook for the new version and that it could also be delivered exactly on time. Fortunately, I had a good installer, so the installation was also carried out very neatly. Even though he didn't know it and this was the first downfall for him. The installation description is excellent!
2024
Due to sustainability and water savings, we have arrived at the Upfall Shower System. Do we notice that we went to take a shower? Not really. The system does take some time to start up, the reservoir needs to be filled, which takes less than a minute. Then a gigantic rain shower with a pleasant, fine spray. We don't notice that we use very little water, this is real wellness. UpfallShowerSystems thanks for the innovative product, SaniDome Van Grinsen 's-Hertogenbosch thanks for the installation and design of the new bathroom. We are very happy with it
2018
We have had the Upfallshower for years and it does what it is supposed to do. The customer a wonderful sustainable wellness shower and for us a minimum of water and energy, that is the shower of the future. Call for availability 088 523 00 00
2016
I am now 70 years old and it saddens me to see how we treat the earth. Even at my age, I still want to do my bit and opted for an Upfallshower that I have been using for a few years now, with less water/energy and waste water and more comfort.
Ellie de Jong
My gas usage has decreased by 35% since I have been using the Upfallshower with my wife for a year. How much less would the use have been if both my daughters had still lived at home.
René Betgem – Creator Upfallshower
2021
A practical innovation with impact in my view. The shower provides enormous savings in precious (heated) drinking water. Compared to the conventional rain showers that easily drain 15 liters of water per minute through the shower drain, the upfall easily saves us 70% in water and energy without compromising on comfort compared to a traditional rain shower. Kudos!
2021
Our new house is completely energy neutral. We use two Upfall showers with 5 people and we enjoy the wonderful sustainable rain shower every day, a wonderful product. We have opted for a small boiler and we are never short of water.
2017
We are at home with 5 people and have been showering under the Upfallshower since 2018. Drinking water is of vital importance and we believe that our children should learn from an early age to be aware of the use of water. With the Upfallshower you have a wonderfully sustainable rain shower.
Martijn Stronks
2018
Through measurements I found out that the water consumption of my family has dropped from 200 m3 to 117 m3 in a year's time and that is of course an immense difference! The Upfallshower at our home uses 1.2 – 1.3 liters of warm water per minute.
Jeroen van Lith
2016
The Upfallshower drastically reduces energy and water consumption during showering, while increasing shower comfort. Since the hot water demand decreases during showering due to hot water recovery, the boiler in a home can be dimensioned small(er).
Marijn Engels
2020
We are very satisfied with the Upfallshower and the good service and information. I am very happy to hear that the showers can finally be placed in hotels. Wishing you much more success with this brilliant product!
Martijn Mulder & Nina Kraus
2019
As a total installer I have designed and built my own energy neutral house. I have placed three black Upfallshowers drain with black taps. A beautiful sight and I have a much smaller hot water supply than I would normally need.
Harold Hotebri
2017
We have been using the Upfallshower since 2017 and are very satisfied with the Upfallshower, the large shower head gives off a wonderful amount of water, while little water is used.
Kees Leenders
2016
We have been using the Upfallshower since 2016. In the context of sustainability and economical use of water, we thought this shower was ideal for our family. And it is: every shower we enjoy the firm, powerful jets from the super deluxe and large shower head.
rola
2015
The Upfallshower is not only a very sustainable product with impressive savings, but also offers solutions for the desire to apply a very comfortable shower without requiring many adjustments to water yield and hot water generator (enough hot water quickly enough).
Iwan Fransen
2017
We were drawn to the Upfallshower by friends. The idea of being able to take a really nice shower again and also do our bit for the environment through the economical installation made it an easy choice for us.
Martijn van Hellemond
2018
We also wanted to build a sustainable house and opted for the Upfallshower. As a family we are happy with this sustainable shower and enjoy it every day. By keeping the system clean, it is hardly noticeable that the shower partially recycles the water.
Anton Chest
2018
I designed and built my own house with a very small water heater for my bathroom of only 30 liters, enough for us together to shower with the Upfallshower. We now shower very comfortably with a unique shower that partially reuses water, it just couldn't be more sustainable.
Pieter Bardoel
2018
The Upfallshower saves more water than a water-saving shower head. In our view, the Upfallshower is a truly beautiful product that we are very happy with. It gives us a good feeling that with the Upfall we have less negative impact on our environment.
Ian Weiler
2014
We also decided to build in a piece of music and a color lamp, our son is the main user. The whole cab works great. All family members are extremely satisfied with their piece of luxury.
Martin Bakhuijzen
2017
My son and I mainly use the Upfallshower, my wife prefers to use the saving hand shower that is also included with the system. Our son can achieve shower times of up to half an hour under the Upfall shower and at times like that I am glad that we have such an extremely economical shower.
Jan Peter van Amerongen
2015
Since we have very little pressure here, the boiler can only produce 11 liters per minute, this Upfallshower seemed to be a good solution for this problem. The fact that this shower is also water-saving and economical in gas consumption was also a very big plus for us.
Marina & Vitel
2015
In comparison, a shower with an economy shower head is a bit shabby… and that while you save even more water and energy with the Upfall shower!
Linda Fransen
2018
As environmental permits coordinator, I am involved in sustainability on a daily basis. My own home has an EPC value of 0. I opted for the Upfallshower. Why? Very simple. The Upfallshower has a positive effect of 0.18 on the outcome of the EPC.
Arend Hoekema
2017
Investing in sustainability and still wanting luxury in the bathroom, that brought us to the Upfallshower. Our self-designed houseboat had to be sustainable, so also our bathroom. Now we can fully enjoy our shower without feeling guilty.
Family Bakker
2019
Very happy with our new bathroom with an Upfall shower. Beautiful to look at and with UV, Infrared, Bluetooth speakers and steam option in addition to the usual possibility to shower under a warm rain shower or to use a hand shower.
Francisca Valenbreder
2018
We wanted to make our new home as economical as possible. Solar panels, a central heating pellet stove, rainwater storage with filtration, a solar boiler and of course a sustainable Upfall shower. We are not bathers, but we would like to have a luxurious shower and that is now possible.
Bergsma . family
2015
All four of us use the Upfallshower every day and recently all five have been using it since 2016. After the first year of use, we even received a letter from Vitens asking why we used so little water!
Peter on the Hof
2020
More economical and more sustainable often means leaving something behind. The Upfallshower shows that economy and comfort go hand in hand and that is what makes it so successful.
Floris Vervat
Very nice product. We have been using this at home for half a year now and are very satisfied with it. Can recommend it! Wonderful shower experience and yet low water and energy consumption.
2019
A double rain shower, the pinnacle of luxury. When calculating we quickly arrived at a water consumption of 2×15 liters of water per minute and we thought that was really a bit too much at this time. In recent years there has been a lot of talk about drinking water use in the Netherlands and we felt we could of course not use 30 liters of water per minute.
Pim and Angela
2018
We started using the upfall at the end of June 2018. Until then, we had a 'shower temple' from hansgrohe, with a rain shower incorporated into the ceiling. Compared to our old shower, the upfall gives more water instinctively. At the same time, the savings on our water consumption are impressive. In 2019, we even consumed slightly less than half of what we did in 2017!
2016
This 'rainfall' shower is in one word DELICIOUS to use. We have been using the shower for 6 years now and we still enjoy the shower every day and we save a lot of water and energy!
2022
Our shower was installed in March 2022 and we are very happy with it. Cleaning is easy, a wonderful shower with hardly any water and energy consumption, real showering without feeling guilty. And if you have a question, they respond quickly, which is great.
2019
Of course, a sustainable shower could not be missing in our fully sustainable hotel. With minimal water and energy consumption, we have been offering our customers maximum comfort for years and they can enjoy it without feeling guilty. Top product, recommended for any hotel or bed & breakfast. Come try it out!
2021
We have 2 Upfall showers one in our bed and breakfast and one in our mini wellness. The guests keep writing about the positive experiences with this shower. We are also happy with it! Guests can take a shower without an insane amount of consumption.
2022
In 2020 we had an Upfallshower placed. We are very happy with this wellness shower, every day a party to take a shower, knowing that you save water and energy. The shower is very easy to maintain. We are very happy with this shower and hope to be able to use it for a long time to come.
2016
In 2016 we purchased an Upfallshower. We shower with no fewer than 8 people with an 80 liter boiler and we are very satisfied.
2022
We are moving and have ordered an Upfallshower again. The water and energy savings are enormous. We are more than satisfied!
2019
Where we have been flushing our toilet with rainwater for years, we also wanted to use water as economically as possible when we moved to Kijkduin. The approval for hotel use of the Upfall was the deciding factor in choosing this highly water-efficient shower system.
The gas price, which has unfortunately risen sharply due to the Ukraine war, significantly shortens the Upfall payback time. A very profitable investment, which you will enjoy every day immediately!
2024
We are moving and have ordered a new Upfall!
2024
As you can see above, it has already been a year since the upfall shower was delivered and installed. I can say that it is doing very well. In short, it is wonderful to stand under it and the fact that it is also good for the environment only makes it that much more beautiful. I would like to thank you, although a little late, for your support and thoughts. Most importantly, René called me to ask if I could rebook for the new version and that it could also be delivered exactly on time. Fortunately, I had a good installer, so the installation was also carried out very neatly. Even though he didn't know it and this was the first downfall for him. The installation description is excellent!
2024
Due to sustainability and water savings, we have arrived at the Upfall Shower System. Do we notice that we went to take a shower? Not really. The system does take some time to start up, the reservoir needs to be filled, which takes less than a minute. Then a gigantic rain shower with a pleasant, fine spray. We don't notice that we use very little water, this is real wellness. UpfallShowerSystems thanks for the innovative product, SaniDome Van Grinsen 's-Hertogenbosch thanks for the installation and design of the new bathroom. We are very happy with it
